
Quick and Easy Croissant Recipes for New Bakers
Imagine stepping into your kitchen and being greeted by the irresistible aroma of freshly baked croissants. You can almost feel the soft, layered texture melting in your mouth—a reminder of cozy mornings and cherished moments. In this guide, you’ll discover everything you need to know about croissant recipes that will help you transform your baking routine and create pastries that impress every time.
Table of Contents
1. Discover the Allure of Croissant Recipes
1.1 The Timeless Charm of Homemade Croissants
You’ve probably enjoyed croissants at your favorite bakery, but what if you could create that same magic in your own kitchen? Croissant recipes aren’t just about baking—they’re about embracing a tradition that connects you with the art of French pastry making. When you make croissants at home, every step becomes an opportunity to refine your skills and savor the satisfaction of a job well done.
1.2 Why You Should Dive into Croissant Baking
- Elevate Your Skills: Mastering croissant recipes pushes your culinary creativity to new heights.
- Personal Fulfillment: There’s an unparalleled joy in biting into a croissant that you crafted with your own hands.
- Share the Joy: Impress family and friends with your homemade buttery masterpieces.
2. The Science Behind Flaky Croissants
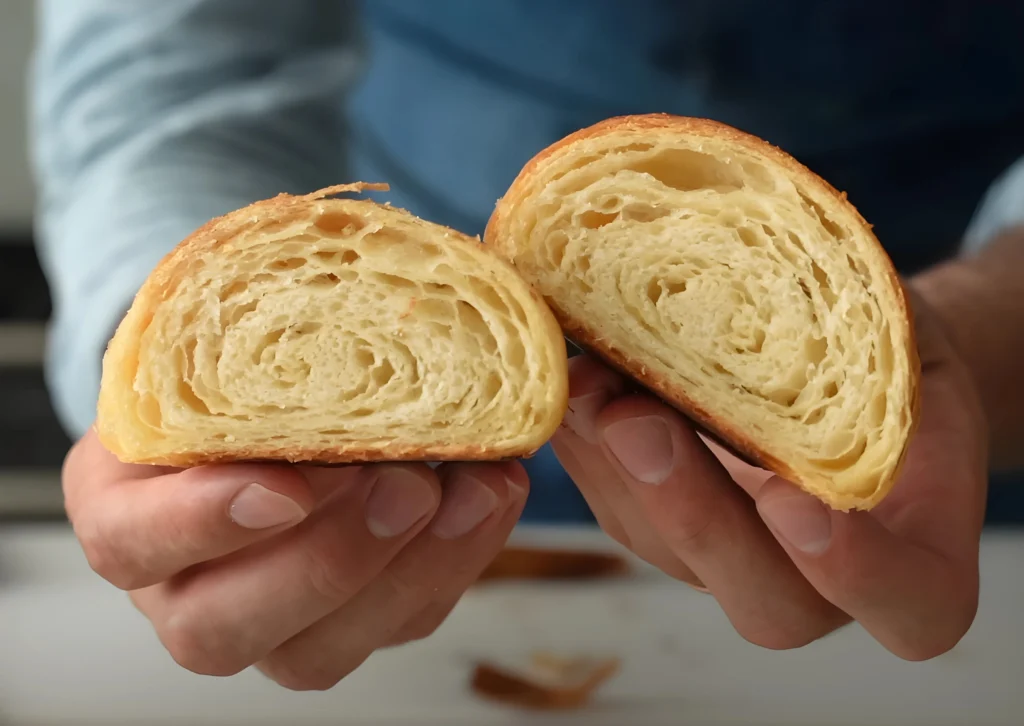
2.1 Understanding Laminated Dough
Creating croissants is all about building layers. When you laminate your dough, you’re folding in cold butter to form countless delicate layers. This process gives your croissants that signature flakiness. Remember:
- Temperature is Key: Keep your butter and dough at the right temperature to ensure clean layers.
- Proper Folding: Each fold adds structure and texture—patience here pays off!
2.2 Essential Ingredients and Their Roles
Below is a handy table that outlines the primary ingredients you’ll need, along with their quantities and functions:
| Ingredient | Quantity | Purpose |
|---|---|---|
| All-purpose flour | 515 grams | Provides gluten structure for elasticity |
| Warm water | 165 grams | Hydrates the flour evenly |
| Whole milk | 165 grams | Adds richness and enhances flavor |
| Instant yeast | 8 grams | Leavens the dough for a light texture |
| Sugar | 50 grams | Sweetens and assists in fermentation |
| Salt | 10 grams | Intensifies flavor and balances sweetness |
| Softened butter | 40 grams | Incorporated into the dough for tenderness |
| High-quality butter | 225 grams | Used for creating the perfect butter block |
Quality ingredients make a difference. Using a premium butter, for instance, not only adds flavor but ensures your layers are distinct and beautifully flaky.
3. Step-by-Step Guide to Making Perfect Croissants
3.1 Preparing Your Dough
3.1.1 Mixing and Kneading
You’ll start by combining your liquid ingredients and dry ingredients in a stand mixer or by hand. Here’s what you need to do:
- Initial Mix: Combine warm water, milk, yeast, sugar, flour, and salt until a rough dough forms.
- Butter Addition: Gradually add softened butter while mixing. This two-stage process helps to fully hydrate the flour and distribute the fat.
- Kneading: Work the dough until it’s elastic and smooth. If using your hands, spend extra time ensuring every bit of butter is well incorporated.
3.1.2 Creating Your Butter Block
To lock in that signature flakiness:
- Lay out two large sheets of parchment paper.
- Place your high-quality butter in the center and gently press it out with a rolling pin until it forms an even rectangle.
- Keep the butter block chilled until you’re ready to laminate.
3.2 Laminating the Dough
3.2.1 Folding Techniques for Flaky Layers
When it’s time to laminate:
- Single Fold: Roll your dough into a rectangle, place the butter block on one side, and fold the dough over.
- Book Fold: After the initial fold, rotate the dough 90 degrees and fold both sides towards the center, sealing in the butter.
- Resting Periods: Allow the dough to rest in the refrigerator between folds. This keeps the butter cold and prevents it from melting into the dough.
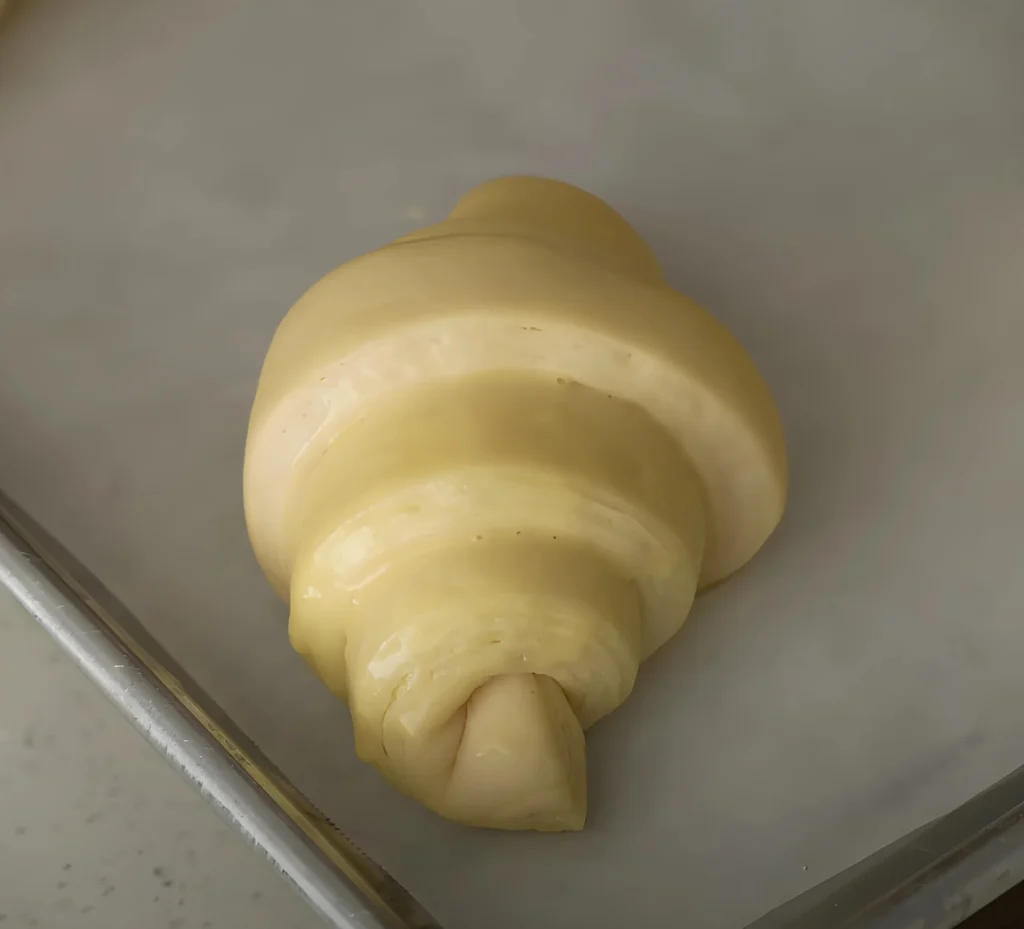
3.2.2 Shaping, Proofing, and Baking

Once you’ve laminated the dough:
- Shaping: Cut the dough into triangles and gently stretch each one to form the classic croissant shape.
- Proofing: Place your shaped croissants on a baking sheet. Create a warm, humid environment (a pan of boiling water in your oven works well) and let them rise until nearly doubled.
- Egg Wash & Baking: Brush the croissants with egg wash for a glossy finish and bake at a high temperature until they’re golden brown and delightfully crisp.
4. Variations to Elevate Your Croissant Game
4.1 Sweet Twists on Croissant Recipes
If you have a sweet tooth, you can transform your croissants into a dessert:
- Chocolate Croissants: Add strips of high-quality chocolate before rolling.
- Almond Croissants: Incorporate almond paste and a sprinkle of sliced almonds for extra crunch.
4.2 Savory Options for Every Occasion
For a savory spin:
- Ham & Cheese Croissants: Roll in thin slices of ham and a layer of your favorite cheese.
- Spinach & Feta Croissants: Mix spinach with crumbled feta to create a flavorful filling that pairs perfectly with the flaky pastry.
4.3 Catering to Special Diets
If you need to adjust your croissant recipes:
- Gluten-Free Croissants: Substitute traditional flour with a gluten-free blend.
- Vegan Croissants: Use plant-based butter and milk alternatives, adjusting the recipe to maintain texture and taste.
5. Expert Tips and Troubleshooting
5.1 Common Challenges and How to Overcome Them
- Tight Dough: If your dough feels too stiff, let it rest for 10-15 minutes to relax the gluten.
- Melting Butter: Ensure your dough and butter are properly chilled before laminating.
- Uneven Layers: Roll your dough evenly and use consistent folding techniques to maintain uniformity.
5.2 Insider Secrets for Perfect Croissants
- Tool Recommendations: Invest in a quality rolling pin and a thermometer to monitor dough temperature.
- Pro Tips: Watch expert videos and read trusted recipes to learn subtle techniques that make a big difference.

Quick and Easy Croissant Recipes for New Bakers
Ingredients
- 4 cups all-purpose flour
- 1/4 cup granulated sugar
- 2 teaspoons salt
- 1 tablespoon instant yeast
- 1 1/4 cups cold whole milk
- 2 tablespoons unsalted butter, softened
- 1 cup (2 sticks) unsalted butter, cold
- 1 large egg
- 1 tablespoon water
Instructions
Prepare the Dough:
- In a large mixing bowl, combine flour, sugar, salt, and instant yeast.
- Add cold milk and softened butter to the dry ingredients. Mix until a shaggy dough forms.
- Knead the dough on a lightly floured surface until smooth, about 5 minutes.
- Shape the dough into a rectangle, wrap it in plastic wrap, and refrigerate for at least 1 hour.
Prepare the Butter Block:
- Place cold butter between two sheets of parchment paper.
- Using a rolling pin, pound and roll the butter into an 8×5-inch rectangle.
- Refrigerate the butter block until firm, about 20 minutes.
Laminate the Dough:
- On a lightly floured surface, roll the chilled dough into a 16×10-inch rectangle.
- Place the butter block on one half of the dough, leaving a small border around the edges.
- Fold the other half of the dough over the butter, sealing the edges to encase the butter completely.
- Roll the dough into a 20×10-inch rectangle.
- Perform a letter fold by folding one-third of the dough toward the center, then folding the opposite third over it, similar to folding a letter.
- Wrap the dough and refrigerate for 30 minutes.
- Repeat the rolling and folding process two more times, chilling the dough between each fold.
Shape the Croissants:
- After the final fold and rest, roll the dough into a 20×10-inch rectangle.
- Cut the dough into triangles with a base of about 3 inches.
- Gently stretch each triangle and roll from the base to the tip to form the classic croissant shape.
- Place the shaped croissants on a parchment-lined baking sheet, ensuring the tips are tucked under.
Proof the Croissants:
- Cover the croissants loosely with plastic wrap.
- Let them proof at room temperature for 1 hour.
- Afterward, refrigerate the croissants for at least 1 hour or up to 12 hours.
Bake:
- Preheat your oven to 400°F (200°C).
- Brush the croissants with an egg wash (1 beaten egg mixed with a tablespoon of water) for a glossy finish.
- Bake for 15-20 minutes, or until golden brown.
- Let them cool slightly before enjoying.
6. Frequently Asked Questions About Croissant Recipes
Q1: What makes a croissant recipe truly successful?
A1: The secret lies in the balance between dough elasticity, proper butter incorporation, and consistent folding. You need to maintain the right temperature throughout the process.
Q2: Can you make croissants without a stand mixer?
A2: Absolutely. While a stand mixer simplifies the process, you can mix and knead by hand if you follow the proper techniques and allow extra time for developing gluten.
Q3: How do you prevent croissants from becoming too dense?
A3: Adequate proofing is essential. Let the dough rise until nearly doubled and avoid overworking it to preserve its lightness.
Q4: Are there healthy versions of croissant recipes?
A4: Yes! You can experiment with whole grains, lower-fat dairy, and even gluten-free flours to create a healthier version without sacrificing that delicious flakiness.
7. Conclusion: Your Journey to Croissant Mastery
By now, you should feel equipped and inspired to dive into the world of croissant recipes. Every step—from mixing and laminating to shaping and baking—offers a chance to perfect your technique and create a pastry that’s both a feast for the eyes and a delight for the palate.
You have the power to transform your kitchen into a mini French bakery. Embrace the process, learn from any mishaps, and celebrate every golden, flaky croissant that comes out of your oven.
Ready to begin your croissant adventure? Grab your ingredients, fire up your oven, and share your journey with friends and family. Don’t forget to leave a comment below with your success stories and any tips you discover along the way!
Now, you’re all set to create croissants that are as visually stunning as they are delicious. Enjoy every bite of your homemade creation and continue exploring more culinary adventures!


